 01732 667 688


Nobody expects to discover a crack in their shower tray during their morning routine, but here we are. When you discover a crack, it’s important to assess whether the damage is minor or if it could indicate a more extensive problem before deciding on the best repair approach. Before you panic and start googling “emergency plumber near me” at 6 AM, take a deep breath. Most shower tray cracks are surprisingly manageable DIY fixes that won’t require a second mortgage.
At Any Drains Direct, we’ve seen our fair share of shower tray disasters – from hairline cracks that seem harmless to gaping splits that turn your bathroom floor into an unintentional water feature. The good news? With the right approach and a bit of patience, you can fix crack in shower tray issues yourself and save hundreds of pounds in professional repair costs.
This comprehensive guide will walk you through everything you need to know about shower tray crack repair, from assessing the damage to achieving a professional-looking finish. We’ll also share some insider tips we’ve picked up over years of dealing with drainage and plumbing issues, because sometimes it’s the little details that make all the difference. Any Drains Direct has extensive experience with shower tray repairs across the UK, providing trusted solutions for homeowners nationwide.
Assessing the damage: is your crack a quick fix or a big problem?
Before you roll up your sleeves and dive into repairs, you need to assess the damage first. Not all cracks are created equal, and misdiagnosing the problem could lead to bigger headaches down the road.
Take a close look at the affected area to inspect the extent of the problem. This will help you determine the best approach for repair.
Identifying crack types and severity
Start by giving your shower tray a thorough clean – you’ll need a clear view of the damage to make an accurate assessment. Remove any soap scum, limescale, or general bathroom grime that might be obscuring the crack.
A hairline crack typically appears as a thin line across the surface and is usually a cosmetic issue that develops from minor impacts or temperature changes. These are perfect candidates for DIY repair and respond well to standard repair kits. Chips are another common type of minor damage, often caused by small impacts, and can also be repaired with patching and refinishing techniques.
However, large cracks or multiple cracks appearing simultaneously often indicate structural problems. If your shower tray feels bouncy when you step on it, or if the cracks seem to be growing, you’re likely dealing with inadequate support underneath the tray.
When to call in the professionals
While we’re all for DIY confidence, some situations require professional intervention. If you notice cracks near the waste outlet, multiple interconnected cracks, or any signs of water damage to the floor below, it’s time to contact a professional plumbing service. In cases where the damage is extensive or repairs are no longer viable, replacing the shower tray may be the best or only option to ensure safety and prevent further issues.
Foundation damage, mould growth, and structural issues can turn a simple repair job into a costly renovation project. Sometimes spending a little on professional assessment upfront can save thousands later – trust us, we’ve seen the aftermath of well-intentioned DIY jobs gone wrong.
DIY guide: your step-by-step guide on how to repair cracked shower tray
Ready to tackle that crack? Here’s how to start repairing a cracked shower tray with professional results.
Before you begin, it’s important to properly prepare the area and materials to ensure a successful repair process.
Gathering your materials and tools
A good repair starts with having everything you need within arm’s reach. You’ll need:
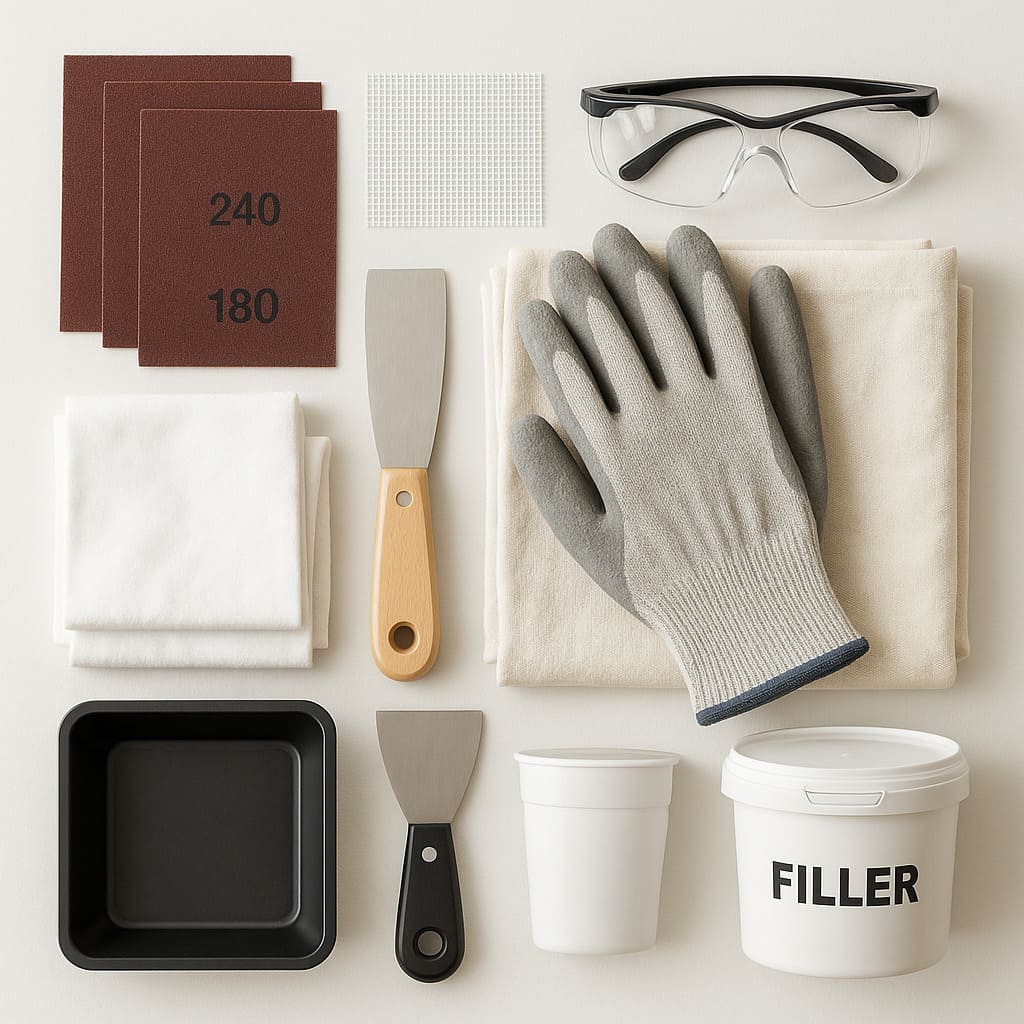
- Shower tray repair kit (available from most DIY stores or online)
- Fine-grit sandpaper (120-240 grit works well)
- Fibreglass mesh patch (if dealing with larger cracks)
- Clean cloths and dust sheets
- Protective gloves and eye protection
- Mixing tray (usually included in repair kits)
- Putty knife and spatula (for applying and smoothing the repair material)
- Filler (for repairing cracks and chips)
Most repair kits contain everything you need, including a suitable repair material such as epoxy resin or filler, hardener, and finishing polish. Make sure the chosen repair material is suitable for plastic shower trays to ensure effective and durable repairs. Always follow the manufacturer’s instructions for the repair material to achieve the best results and a seamless finish. Investing in a quality kit will give you better results and longer-lasting repairs.
Preparing the repair area
Preparation is where many DIY repairs go wrong, so don’t rush this stage. Lightly sand the cracked area and surrounding area to create a rough surface for better adhesion of the repair compound. The goal isn’t to remove material, just to create a surface the repair compound can grip.
Before starting the repair, thoroughly clean the surrounding area to remove any grease and stains. After sanding, use a clean cloth to wipe away all sanding dust and ensure the area is completely dry. Any moisture trapped under your repair will cause problems later, so patience here pays dividends.
Applying the mesh patch (for larger cracks)
For cracks longer than a few centimetres or any holes in the shower tray, a fibreglass mesh patch provides essential reinforcement. The mesh patch can be used for holes as well as cracks, ensuring the damaged area is properly supported. Cut the mesh slightly larger than the damaged area – you want complete coverage with some overlap onto sound material.
Position the mesh over the crack, hole, or chip and smooth it down, ensuring there are no air bubbles or wrinkles. The mesh should lie flat against the surface and follow the contours of the tray. Use the patch and repair compound to fill chips in the shower tray, creating a seamless and watertight finish.
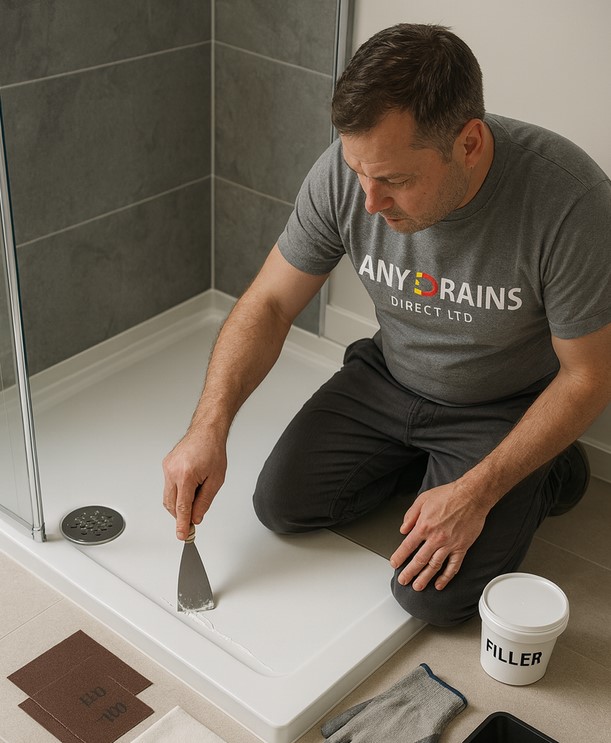
Mixing and applying the repair compound
This is where things get time-sensitive. Most epoxy repair compounds have limited working time once mixed, so read the instructions carefully and have everything ready before you start.
Mix only the amount you need – it’s better to do multiple small applications than to waste material. Use a putty knife or spatula to carefully apply the filler, making sure to thoroughly fill the crack. Work the filler into the damaged area and build up slightly above the surrounding surface level for a seamless, watertight finish. Don’t worry about perfection at this stage; you’ll sand it smooth later.
Curing and finishing the repair
Allow the repair to cure completely – rushing this stage is a false economy. Most compounds need at least two to three hours, but overnight curing produces the best results.
Once fully cured, sand the repaired area smooth using progressively finer grits of sandpaper. Start with the coarsest paper to level the repaired area, then move to finer grades for a smooth finish that blends seamlessly with the rest of the tray.
If needed, use paint to match the original colour and restore the appearance of the shower tray. This helps to restore both the look and the functionality of the tray.
After painting, seal the repaired area to prevent water leaks and protect the repair. Proper sealing is essential to restore functionality and extend the life of your shower tray.
Always follow the product instructions carefully for all sealing, painting, and finishing steps to ensure the best results and a durable repair.
Professional insights and expert tips
After years in the drainage and plumbing business, we’ve learned a few tricks that can make the difference between a repair that lasts months and one that lasts decades. Professional shower tray repairs are essential for restoring both the functionality and appearance of your shower, ensuring long-term results and a watertight finish.
Supporting your shower tray properly
Many shower tray problems stem from inadequate support underneath. If you have access to the underside of your tray (through a removable panel or from below), check that it’s properly supported. Flexible shower trays need solid support to prevent stress cracks from developing.
Adding additional support brackets or adjusting existing ones can prevent future cracks and extend the life of your current tray significantly.
Common mistakes that doom DIY repairs
We’ve seen plenty of repair attempts that failed because of easily avoidable mistakes. Applying repair compound to dirty surfaces, rushing the curing process, and using the wrong type of repair kit for the material are the most common culprits.
Another frequent error is ignoring the root cause of the crack. If poor support caused the original damage, simply filling the crack won’t solve the underlying problem.
Combining repairs with drain maintenance
Since you’re already working on your shower area, consider this an excellent opportunity for some drain maintenance. Hair, soap residue, and other debris can cause blockages that lead to standing water – and standing water can exploit any weaknesses in your repair work.
A thorough drain clean and inspection can prevent future problems and extend the life of your newly repaired shower tray.
Frequently asked questions about shower tray crack repair
How long does a DIY shower tray repair last?
A properly executed repair using quality materials can last several years. However, the longevity depends heavily on the underlying cause of the crack and whether it was addressed during the repair process.
Can I repair cracks in all types of shower trays?
Most acrylic and resin-based shower trays respond well to standard repair kits, but it’s important to choose a suitable repair kit that matches the specific material of your shower tray for the best results. Stone resin trays may require specialised repair compounds, while ceramic or natural stone trays often need professional attention.
Is it safe to use the shower immediately after repair?
No – allow at least 24 hours for the repair to fully cure before using the shower. Using it too early can compromise the repair and lead to failure.
What if the crack reappears after repair?
Recurring cracks usually indicate structural issues that weren’t addressed during the initial repair. This typically means the shower tray needs better support or may require replacement.
How much does professional shower tray repair cost?
Professional repair costs vary depending on the extent of damage and local rates, but expect to pay significantly more than DIY materials. However, professional repairs often come with guarantees and can address underlying structural issues.
Don’t let small cracks become big problems
Shower tray crack repair doesn’t have to be intimidating. With the right materials, proper preparation, and a methodical approach, most homeowners can achieve professional-quality results that last for years.
The key is acting quickly when you spot a crack and taking the time to do the job properly. A weekend spent on careful repair work can save you thousands in water damage and replacement costs later.
However, if you’re dealing with extensive damage, recurring cracks, or structural issues, don’t hesitate to seek professional help. At Any Drains Direct, we’ve helped countless customers with drainage and plumbing challenges, from simple repairs to complete bathroom renovations.
Ready to tackle your shower tray repair, or need professional advice on your specific situation?
Contact Any Drains Direct today for expert guidance and a free quote on any drainage or plumbing work you need. Our experienced team is here to help you maintain your bathroom in top condition, whether that’s through DIY guidance or professional repair services.